ponedjeljak, 10. veljače 2014.

The most expencive world guitar

Today the market of rare guitars , guitar where they played the most famous guitarists , guitars that were produced at the beginning of the century in a couple of pieces , there are rare examples that have collector value that reaches a fortune.
Thus, for example, in London exposed for sale guitar Jimi Hendrix . legendary Fender Stratocaster facing wire .U things Stratocaster body was " right hand " and the neck " LeftHand "
. Guitar Hendrix played at the Miami Pop Festival in 1968 , and is ongoing concert flamed on stage . The guitar was burned to the end but it was such a Jimi gave Frank Zappa . Zappa had restored , he played a long time on it , and he gave his son Dweezil who on her playing today. The guitar will be auctioned unquestionably reach astronomical prices because it Dweezil decided to set up the auction with a starting price of £ 400,000 ( British pounds ) , the equivalent of approximately 4 million Kuna  .. How much will only reach its value at auction, one can only speculate .
Dweezil has a collector in Las Vegas allegedly offered half a million dollars , but the younger Zappa refused to sell , believing that he can get more .
To date, the record price was the guitar Eric Clapton guitar , sold for $ 470,000 .
In fact , we need to distinguish between public auction when the price reaches unreal amounts and vintage sales when the price is really a rare specimen .

At the auction the " Black Beauty " Les Paul Gibson Eric Clapton , sold for $ 950,000 . Which is considered the upper limit of the price ever reached an electric guitar .

Guitar frets setup

Neck handle (Eng: fingerboard) is a long thin strip at the front neck where you are impressed thresholds or traverse instrument, usually made ​​of laminated wood (and other materials). The most noticeable in those instruments that do not have on my neck thresholds. The purpose of putting the clamps "through the neck" of the instrument is that when playing as a musician presses the wire down to the threshold, and thus short its length as vibration ultimately produce tone. Hook has the task to its hardness prevents possible damage to the body neck. 
The word "neck handle" in other languages ​​often is related to music genres, first of all the stringed instruments such as, in Italian, where the name "manico or tasto" with the phrase "sul tasto" usually prefers to use bows and playing stringed instruments.
Detail of guitar neck


On the neck ( or clamp ) design is planned to build the thresholds at which the vertical pressure on the wire musician assist in precise " stopping " in a certain place , and is enabled with less power than just fingers attenuate vibration of strings . Thresholds are usually fixed to the gripper as the guitar or the mandolin , but can be as in the example that the mobile lute . Interesting fact is that during the history of the lute strings of animal gut it fit together with thresholds of intestine wrapped and tied around her neck . This position thresholds and wire lute created a big problem as musicians , and those who have studied music theory . 

Neck handle can also be designed and fretless ( Eng : fretless ), which is mostly the case with stringed instruments .
Rosewood neck

Instruments with gripper without thresholds allow the musician more control over subtle changes in a given time than models with thresholds , but are generally considered more difficult instruments to overcome precise intonation . You can see examples of clamps that are a hybrid design of the two aforementioned models . Such an example is best seen on the instrument the sitar , where his arched thresholds attached to the edge of the neck . Unlike instruments with thresholds where the pressure to establish contact with the wire clamp , on this instrument fretless tone will produce pressure on the wire below the threshold .
Fields on the trap neck share thresholds , and user friendly reference works among them are marked orientation markers tones ( usually a dot or square ) on electric guitar on the 3rd , 5th , 7th, 9th , 12th , 15th , 17th , 19th , and 21st , field . Variations in making tons of markers really are colorful , so that the already mentioned there are models where for better visibility placed sideways on the edge of the neck , even to the mounting LEDs as an adventure in the dark stage .
Over time thresholds are worn out resulting in " buzzing " tone because the wire gets stuck for the next threshold . State thresholds in the trap can be checked by a simple method that is pressed against the ruler along the length of the neck sills , and visually determine the deviation of the threshold level of the threshold . In case of deviation thresholds must be sanded to the same height .
Frets of modern electric guitar

Variations : with models with the design of flat thresholds , there are models of guitars with curved or bent thresholds , which was designed by Andres Thidell from Sweden . The aim of which is amended in order to achieve this model thresholds gain cleaner and longer duration tons in the right harmonics ( in musical jargon - sustain ) . Effect precise tonal accuracy resulted in a better discrimination of tones with balanced and full sound .

" Thidell Formula 1 "  invention and design of these thresholds in models of guitar playing is possible that it would not be possible to perform so well on the classic flat thresholds .

srijeda, 5. veljače 2014.

Instalation of truss rod

Truss rod is used today in nearly all models of guitar regardless of whether they are acoustic , electric and bass guitars . The main purpose of rods in the neck as some think it is not held to the neck in the same position and to prevent warping neck.
Purpose rods in the neck , in fact , that is already distorted , bent necks back in the position in which they should be . Wood is a living material , regardless of age , degree of dryness , handling , and weather conditions , and will always " work " . Truss rod is constructed so that its location in the middle of the neck by use of force , which affects the environment , ie neck , and will be straining your neck to bring the nut straight condition .
Some truss rod rods are designed so that they can act in two directions , strain or releasing neck . However most of the truss rod rods only work if the neck twisted in the convex side, and straining can come back .
Truss rod can be adjusted in two ways, depending on the placement of the neck , if the bar is located below the neck ( skunk stripe system) then it is usually the parent is under the control of the NUT 's on the headstock , and if it is below the fretboard , then the regulation in neck pocket of guitar..

Potentiometers & switches

All signals coming from the magnets are sent to the center for treatment and control signals. The signal from the magnet selected with the corresponding positions intensifies, adjusts the color tone and via the Volume potentiometer sends the amplifier. Signals from the magnets can switch to select just one, two or all three together breath guitar has such a schedule magnet. 
  There are also options mRNA (sharing the signal from the humbucker compounds in series or parallel). This provides a certain tone to the desired choice
Fender style switch
The signal that comes from Volume potentiometer, it increases logarithmically as suitable for emergency signal amplification. Regulation tones are ofabire linear potentiometer. 
Potentiometer for color tone, parallel placed ceramic capacitor, typically 0.22 to 0.47 nF.
Tone control set
      
Potentiometers regulating exit humbucker are usually of 500K, while in ordinary pickups 250 K.
Double potentiometer
Switch to select the work of the magnet has a three position in the case of two magnets , or 5 position if the guitar has three magnets .
Ibanez & PRS type switch
Such switches are offered a choice of all possible combinations of signals around the dial .
Shematics diagram 2 hums
Some guitars have a whole set of amplification and signal selection on one panel ( Fender Stratocaster , Fender Telecaster )
    
while some have specifically placed separately on the body ( Gibson , Ibanez )
    

The signal from the switches and potentiometers sends the output of the guitar where he was placed OUT jack . The terminal is equipped with contacts ( usually 2 or 3 ) , which are universal to fit each cable for each guitar . It is a dimension of 6.3 mm and has the same two or three contacts , minus ( - ) pole or mass ( GND ) and hot ( HOT ) contact .
Simple out jack
Out jack with battery plug
Output jack plate
Output jack connector
                                                                                                                                             
A third possible contact is the contact for the battery in the guitar with electronics for amplification ( active pickups ) . Turning off the cable from the guitar, the contact closes battery power , which is located in the electronics of the guitar.
Battery for active coils

utorak, 4. veljače 2014.

Making a guitar neck


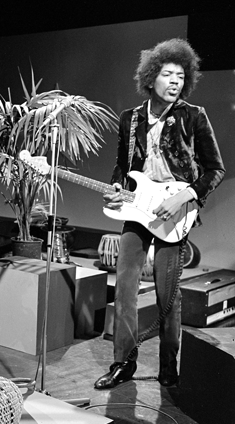
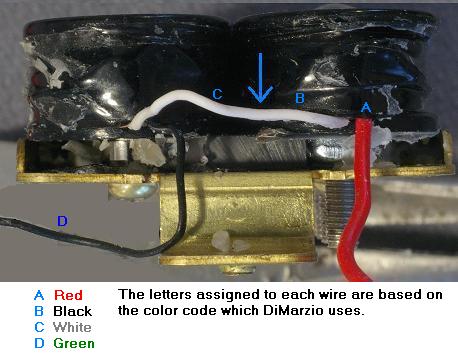
 After selecting the wood for the neck of the guitar (maple, walnut, mahogany) based on pre-cut template, or dimensions with the design, convey a sketch on wood. As I described earlier wood should be dry, flat, without bumps and cracks. In this post I will describe the gates of the Fender Stratocaster Style and Style for Gibson.
Fender guitars have a neck with a so called flat headstock
While Gibson style guitars have neck with angled (angle) headstock

Due to such a construction door should take into account the length and thickness of the wood pieces for the neck. So for a flat headstock dimension pieces for the neck should be 650 x 120 x 30 mm ..

Such a cut piece will be called. "maple neck."
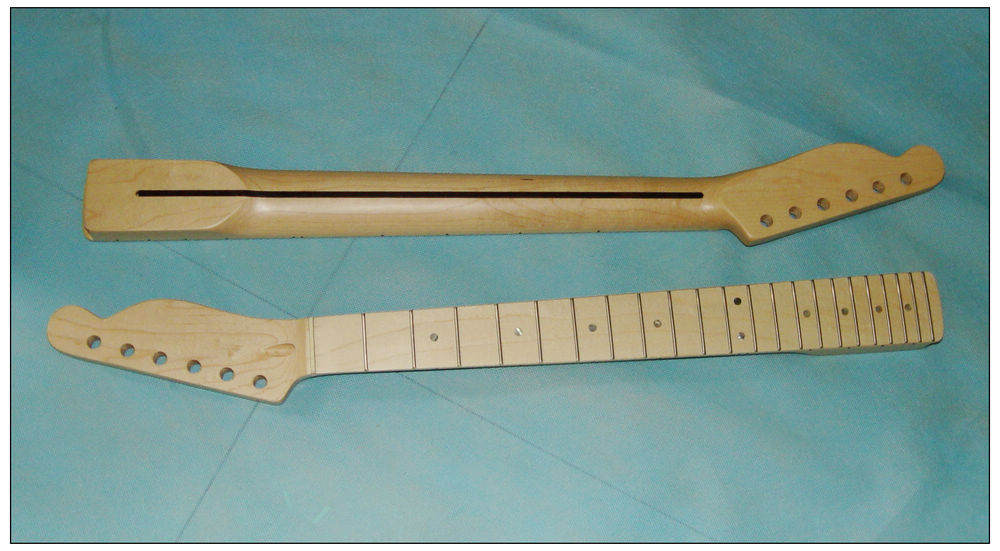
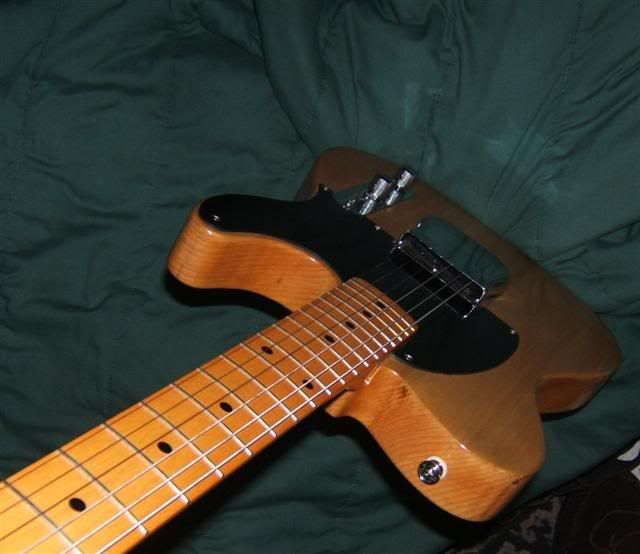
Telecaster style neck (maple)
These dimensions are only valid if the truss rod rod to be inserted under the door. If you will use the truss rod rod below the fingerboard, then it will be a piece of cutting dimensions 650 x 120 x 22 mm. This is because the fingerboard will be especially glued to the neck, and its thickness will be 4-6 mm.
Telecaster style neck (rosewood)
On such a cut piece of wood is taken up with a sketch or draft template on a piece that will be cut . Best crop band saw.

But since it is such a machine builders unavailable amateurs , can be cut with the jigsaw . Jigsaw has to be high quality , or at least good quality blades ,
Professional jigsaw
 Otherwise, it happens that saw crops , and will at the lower end piece that is cut out to be the correct dimensions . Crop should be at least 3-5 mm outside dimension for later fine processing .
When the neck is cut into rough form , the following operation is cutting channels for the truss rod . The channel is cut from the bottom, if we have a common "one way " truss rod " , or from above if the "two
way "  bar or " martin style " .

One way trus tod
After inserting the rod in the neck , and it must be done so that the rod does not " Luft " , that is, can not move in either direction , otherwise , its activity will not be effective .
Rod should be closed " Kyle " or closely cut a piece of hardwood that will be glued firmly pair well with your neck .
Vart cut into rough , so " beyond measure ." Below are the top of the crop " thinning " headstock approximately 16 mm ( roughly ) .

For processed so that the neck thinned the headstock , drill the holes for the tuners ( tuners ) . Fender guitars that I describe here , the holes for the tuners are drilled at a distance of 1 " (25.4 mm ) , with a diameter of 10 mm . Headstock final thickness is 14-15 mm ..
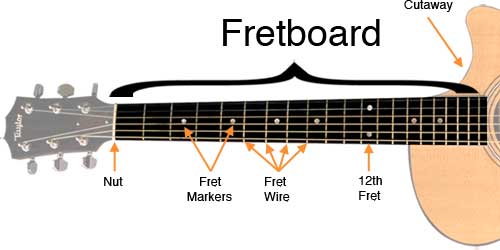
The front side of the neck ( fingerboard ) should ideally leveled so he could slice up " radius " . Radius of neck is actually curved portion grips on a particular measure . If we say that the radius of the neck 12 " it means that it is part of the circle of diameter 12 " (25.4 cm), and the neck is just a cut segment . Thus , if the radius is larger necks , the curvature of the door will be lower and vice versa .
Compound radius of neck
The figure is indeed so . " compond radius " , which means that the larger the radius of the door as the distance between the lower threshold . Most often operate neck with fixed radius
,
After inserting the rods derivative claims , and the thinning of the headstock , exceeding the finish of neck on the lower side , Despite mechanization and various machines , it is almost impossible without a CNC machine to make the neck to the end . This is where the " hand made" , ie handiwork . Neck by labels that are made ​​in the neck , gradually tapering , according to the form that was given before .
This is the most critical situation because if too much " scratch " in the tree , there is no return or repair . because this is the most critical part . Usually this operation is performed using a file , and it very cautiously and gradually .
After a rough rasp works , more finalizing or glass , or sandpaper . This is where the experience and precision .

This post refers to a straight headstock of the guitar such as Fender , and some others, while the Gibson guitar neck is made significantly different and in a different way .

Headstock that door is tilted about 13 degrees to the rest of the neck , so the material for the construction of different compared to the above.

Ideal would be that the neck is made from one piece of wood , but this is often not practical or possible . Then comes into consideration only gluing the headstock .

In the illustration above , it is evident a way to come up with angle headstock " headstock angle neck "

Everything else in the construction of the same is more or less as described above .
The neck finish gradually with all the finer sandpaper until the final in 1000 ( number of grade sandpaper )
Fingerboard regardless of whether it is bonded or " one piece maple " , after sanding block radius and dimensioned according to the final measures , is ready for threading slots " channels " for thresholds .
This deal is also very critical , because it is 1/10 millimeters . If it is a standard scale used by Fender , then the scale of the neck first be accurately dimensioned .
There's a site where there ONLINE Fret Calculator
http://buildyourguitar.com/resources/fretcalc/jscrptclc.htm
Before cutting out slots in the neck to put INLAY DOTS ( the point on the field ) . Ideally, the color or contrasting points of the inverse of the fingerboard


Thus, the length of 25.5 inches ( inches ) , respectively 647 , 78 mm will be distributed by the NUT to the Bridge. Since the notch for the NUT was previously defined and labeled , starting slots for measurement thresholds .
This will be the first threshold away from the NUT 's EXACTLY 36.48 mm and the last 21 threshold will be the NUT 's EXACTLY 456.75 mm .
Especially important was the distance 12 threshold that must be exactly half of the scale , then the NUT to 12 threshold distance is 323.9 mm .

It is understood that the distances between the thresholds correct , otherwise it will not get the correct intonation at higher frequencies .
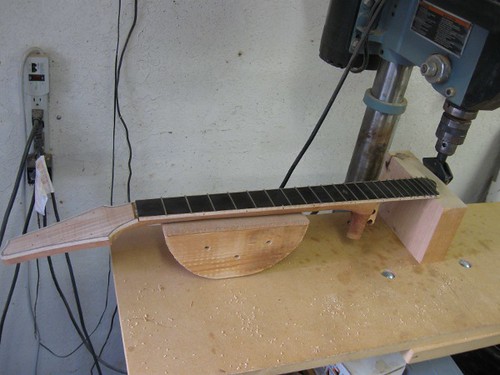
Threading slots ( slots ) for thresholds is a delicate operation that requires experience , knowledge , tools and patience . It is ideal for such cutting that there is a fine  length of 20 cm and thickness of sheet 0.20 to 0.25 mm . Saw must have very small teeth ( 15-20 teeth per inch) . It is also advisable to drink a stop to the depth of cut to the grooves were equally profound .
Thresholds cuts the length of the neck width and 3 mm. The thresholds are slightly Punch in on only one side of the neck so that they are held. After all loaded neck sill is inserted into the mold to press.
It is not recommended that the thresholds had flown even if the rubber or wooden hammer, because it disrupts by driving radius threshold. The press, which has a section that is injected into the slot threshold helps to thresholds injection into deep notch equally and with the same pressure.

The excess of the thresholds from the side of neck is being cut frontal very sharp and thin pliers, a finely honed scalpel and stone grinding wheels. Sharp edges are lightly frontal hone fine fingernail files from time to protect the fingerboard taped against damage.

Neck after injection thresholds by thresholds sanded surface and leveled to the same height, and polished with fine sponges and toothpaste to shine.

Making a guitar body

After drying, the wood of which we intend to build a guitar body ( I prefer alder ) , move on to merge 2 or 3 parts boards that are pre cut to size . So if you are working in a copy of a Fender Stratocaster , than be glued parts have dimensions of 500 x 340 x 50 mm .
Telecaster model


The boards connect to the reverse -facing sides are cut , the reason that the compounds do not distort . Sides to be bonded must be perfect leveled the lathe . At trial merger without sticking , when pres should not be seen on the other side of the slot . Suggest prepared timber, ready for gluing mark , and squeeze clamps without adhesive . so we'll see any errors in the planing and eliminate disadvantage. If all is well, then top edges of both sides of wood glue (I suggest Titebond glue ) , thin plastic spatula very slim , because the glue is already non pressure material and the excess does not go out. The best way is to wait 3-5 minutes to soak the wood glue , and then squeeze as much strong constraints . Ensure to squeeze a piece radially diluting . Keep it glued at least 24 hours in a warm room , an airy but certainly not in the sun .
After drying glue off our discipline , and so stuck a piece ready for further processing . It is important to follow the procedure . The biggest misconception is young and inexperienced builders to cut out the body first right at the planned dimensions , Why ? , Because the possible errors in the grooves of the neck , pickups and bridge , in the case of multiple errors can not fix .
Thus, the sequence denote the exact measurements and a sketch of a guitar according to the draft or template . After that first it is important to position the slot neck (neck pocket ) . Mark the location exactly where it will be positioned neck . When Stratocaster is to sketch like this:
Stratocaster template and plane


So the neck that you first created and its dimensions ,gnow place on boards which will be neck pocket . When the neck pocket is perfect for scoring , and therefore need a milling machine . , The neck should be adjusted , screw and fasten it will be when the guitar is finished . This will create the conditions for accurate positioning Bridge , magnets and other things that go on the body .
Bridge position ourselves to advance the desired focusing scale , so that the seat where the wires lie exactly on a distance scale measured from the NUT 's headquarters to the wire . By this measure it is easy to determine the place where the bridge will be located . So important is the direction and length scales . It is important to determine exactly what type of Bridge will be installed , or the best that we have at hand .
It is particularly important that the neck bridge positions . This will be determined by the 1:06 guitar tuner project plus stabilizer thin nylon thread ( one for fishing ) . Following the edge of the guitar neck , project plus stabilizer thread and thin nails is knocked into the body of the guitar where the bridge will be .


According to the Bridge position , put the template plate with electronics ( pickguard ) or best original panel that will be installed . The holes on the board and mark pen drill bit 2 mm , depth 8 mm . At the same time mark the magnets while the board to the board ..
Only when everything is checked, the first drill all the necessary holes for magnets , sensors and OUT jack . Do nothing more to shape the board should remain just drawn and well visible on the board .
Only when everything is milled , neck and attached plate with electronics , free format layout boards . First, the upper side plan fine , so that the surface is flat and smooth .
It is important to note that the neck attached to the body is planed the upper hand to be raised by about 5-6 mm above the body of the guitar , or for dept fretboard . The neck should be parallel with the body of the guitar.
After fixing critical parts ( neck , bridge and magnets ) , guitar body can be cut into the final shape . The cuts are about 3 mm beyond measure due to finish . Thinning of the body to measure ( approximately 46 mm ) should be done on both sides . After milling slots ( holes for magnets and switch and output jack ) which are hidden under the board , moves to gradually finish body guitars .
First abrasive paper 150 ( best turnaround eccentric sander ) , and then paper No. 250 In the absence of such a grinder , it can be done manually , sandpaper and " puck "
but the procedure is laborious and time-consuming . The intention is only to the body equally sanded on both sides , and evenly and that there are no holes , cuts or bulges . After sanding , the body should be smooth as glass. On such a smooth body should apply the basic nitro lacquer to dry grinding . If you want the body of the guitar nuanced in another color , it should be clean , dry , apply a stain body from dust . Stains on the nature of the material that is absorbed into the wood and gives beautiful shades of color you choose . The visible contours and texture of wood . Stains should be applied with a cloth , sponge , light but continuous movements . It should be applied so as not to see the transitions . If you want more intense shades , is applied in multiple layers at an interval of 15 minutes .
Once the wet colour must not be more sanding . If we want to remain only on the body contours of the texture of wood , then repeated applied
sand paper No. 400 Then it will be only the contours of the wood there is a di stain penetrated the deepest .
So that is sanded ,cover body impregnate transparent nitro lacquer fundamental for dry sanding . The paint thinned with nitro thinner at a ratio of 1 : 1
We apply a thin brush strokes faster . It is important that the ambient temperature is below 10 degrees . Dried for approximately 1 hour . Thereafter abrasive dry sandpaper No. 400 Best grinder , but it can also manually . Here is where a good proportion bije.li abrasive powder like flour . Delete " dust " , and repeat the operation at least three times . After that, the surface is smooth as glass .
Telecaster model

The body of the guitar is ready for finishing . Finish can be made ​​in three basic ways :
1.lacking some of topcoats ( nitro cellulose , polyurethane or water-based varnish ) .
Second Shellack finish is a special procedure that will be described here .

How to change guitar's coils (humbuckers)?


Many guitarists have often had major problems when it should change the magnets ( pickups ) on guitar . Most often it was inexperience and ignorance , and when the owner of the guitar it just took someone else to make the next payment services .
Each manufacturer humbucker pickups and has its own color lines leather- wiring is made guitars . Most of  the method feeder with black and white wire. Since magnets are concerned , these are the poles , ie + or - half . So is white wire was + and black - half .. The problem arises when it comes to humbackers .
What are humbackers? . Humbackers are in fact double single pickups are connected inversely . They can act as a serial connected and connected in parallel , so that the guitar using switches receive various effects .
The most common problem is if you want the humbucker that has only two independent feeders get two pickups so they could be split up or how it says " 
Gray or white wire connects both ends of two magnets inversely . So the positive pole and the magnet is connected to the negative pole of B magnets . Other two wires ( red + black and half - half ) are in fact the main output from both windings .. Wire that connects the two magnets , then gray or white on the center of the cut .
So we get four excerpts of which are now as follows :
A red B + pole magnets
B black negative terminal of a magnet
C gray cut on one side of the A + pole magnets
D Gray cut on the other side - half a magnet.
What we get now ? We got as if we have two separate magnet.
To perform various different combinations ( mRNA , reversing or turning phase ) we have more options.
The figure below shows how to perform these operations using various switches :
Classic Stratocaster guitar wiring:

Les paul wiring:
Three singles paralel wiring
or serial:
Wiring colour code some off guitar manufacture: